this is the place where i poured stories of my life, my thoughts, my feelings also my ideas.
there's excitement, sadness, laugh, desperate, anger, happiness, and other kind emotions.
i just hope that we can learn something..
Showing posts with label kitchen. Show all posts

Friday, July 08, 2011

Our 4th Anniversary Cake


For our 4th anniversary, I baked a chocoholics cake. I don't remember where I got the original recipe because I handwrote it on my recipe notebook like years ago. But I do tweak it a bit, using dark cooking chocolate because I love dark choco and in my opinion, it taste better than cocoa powder. 


Here's the recipe for the Moist Choco Cake :


250 gr plain flour
50 gr shifted cocoa powder (I use one and a half block of Nestle DCC)
100 gr dark muscovado sugar 
250ml boiling water
125 gr soft unsalted butter
150gr caster sugar
1/2 tsp baking powder
1/2 tsp bicarb
2 tsp vanilla extract
2 large eggs

Method :

  • Preheat the oven to 180 °C, line a 18x10cm round baking tins.
  • Chop the chocolate blocks, put it on a microwave safe bowl, set for 1 mins 30secs, paused every 30secs to avoid burning the chocolate.  
  • Put the muscovado sugar into a bowl and add the boiling water until dissolve, set aside. 
  • Put the flour, baking powder and bicarb in another bowl, set aside.
  • Beat the butter and caster sugar until pale and fluffy. Add vanilla extract to the butter mixture, still mixing, then add the eggs one at a time, then add the flour mixture. 
  • And the last, fold in the melted dark chocolate and muscovado sugar mixture. 
  • Pour into the baking tin, bake for about 30 minutes or until a skewer comes out clean. Let cool. 
For the decor, I want to try making the shaved chocolate or chocolate curl, but I don't have those proper tools (flat metal spatula and metal scraper), so I just use my knife and a ruler (!). Please look for tutorial on the web for more precise and professional steps. 


I just melt the rest of the chocolate block with 70ml vegetable oil (as substitute of 1 tbsp of Crisco shortening) in a microwave. Mixed until even, then pour into a clean and dry and flat surface, spread it as thin as you can. Then leave it until firm and set, after that you scrape it to one small section at a time to make a curl. Since I don't have those nifty tools, I ended up with rather thick layer of chocolate mixture (you can see it in the pic), and it's a bit hard to scrape. As the result, instead of chocolate curls, I got chocolate barks because they resembles tree bark :) Looks awful but taste good tho.. 


Then, I made a frosting, not from heavy cream or butter or other type of usual suspects of frosting. My frosting is mascarpone cheese and icing sugar, sounds weird, isn't it?

For my frosting :
3 tubs of mascarpone cheese, softened in room temperature.
75gr-100gr pure icing sugar ( you can use more or less to suit your liking)
Beat them together until even.

To assembly :
  • Slice the cake horizontaly with serated knife. I got 3 even layers and 1 super thin top crust, I only use 3 layers because the frosting is for 3 tiered cake.
  • Place one cake layer on a plating dish/base, spread with 1/3 of the frosting. Repeat with the other 2 layers. Decorate as you desired, but in my case, I cover it with chocolate barks.


Thursday, June 30, 2011

slaving for beef roulade..

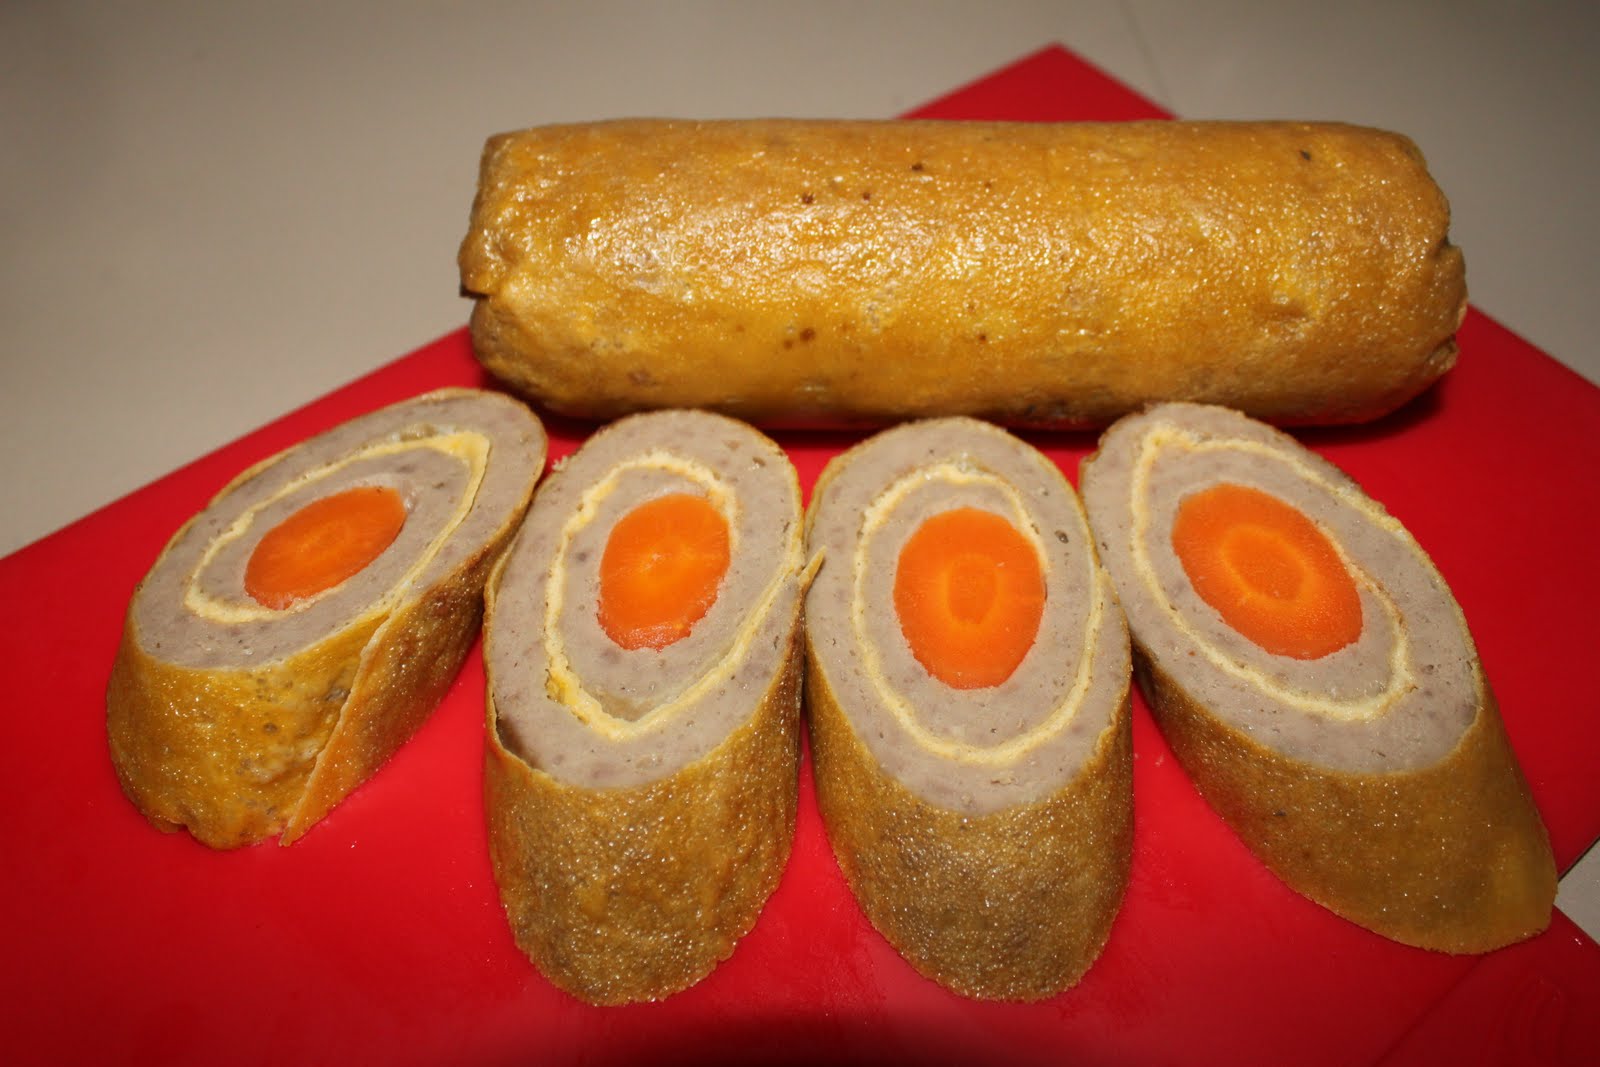
Hari ini saya punya 1,1 kg daging sapi cincang yang premium, niatnya disulap jadi bakso dan  bakso tahu karena sekarang sedang musim dingin dan kayaknya enak banget kalau makan selalu berkuah panas-panas.. Setelah menghaluskan daging pakai processor, kok kayaknya jadi banyak sekali, akhirnya saya sisihkan 1/3-nya dengan niat mencoba bikin roulade daging sapi (beef roulade). 

Beef roulade termasuk salah satu hidangan favorit saya, tapi Mami jarang membuatnya, hanya di jamuan Natal atau ulang tahun. Seringnya saya mendapati roulade di prasmanan pesta kawinan, dan menjadi salah satu target. 

Googling sana-sini, dapat resep macam-macam (banyak modifikasi ada yg pakai sayuran atau keju dalam rouladenya), tapi karena ini percobaan perdana, cukup mencari resep dasar saja lah. Saya nggak mau neko-neko karena takut malah kecewa karena ekspektasi ketinggian.

Nah, karena 1/3 bagian dagingnya tadi nggak ditimbang, saya jadi nggak tau persisnya berapa gram daging yang dipakai untuk rolade saya ini, perkiraan saya sekitar 400gr lah.. 

Resep bahan isi rolade daging :

  • 400 gram daging sapi cincang
  • 2 lembar roti tawar tanpa kulit
  • susu cair secukupnya
  • 1 butir telur
  • 1 sdm bawang putih bubuk
  • 1/2 sdt merica bubuk
  • 1/3 sdt pala bubuk
  • 1.5 sdt garam 
  • gula pasir sejumput
  • 2 batang wortel yang lurus dan besarnya hampir sama dari dari ujung kepala hingga akar, kupas kulitnya.


Bahan dadar kulit rolade :
  • 2 butir telur
  • garam halus secukupnya
  • margarin secukupya
Cara membuat :
  • Dadar: Kocok telur dan garam. Karena saya tidak punya wajan dadar yang besar, saya nekat mencoba bikin dadar di oven dengan menggunakan baking tray ukuran 25x30cm, dengan pertimbangan lebih praktis menggulung rolade dengan dadar telur berbentuk persegi panjang dibandingkan dadar telur yang bundar. Panaskan baking tray di oven suhu 200C selama 10 menit, oles baking tray dengan sedikit margarine, tuang setengah kocokan telur, ratakan, masukkan ke oven yang diturunkan suhunya ke 150C. Awasi telur jangan sampai terlalu kering karena nanti gampang patah/sobek saat di gulung. Ulangi untuk kulit kedua. 
  • Isi rolade : menggunakan food processor, proses roti tawar hingga hancur berbutir, tuangi susu hingga terserap roti, tambahkan telur, merica, bawang putih bubuk, pala, garam, gula, proses lagi selama 10 detik, baru masukkan daging giling (yang kebetulan sebelumnya sudah di haluskan) dan proses hingga tercampur rata. 
  • Ambil selembar dadar, potong sisi luar dadar yang cenderung kering dan krispi, beri setengah adonan daging, ratakan permukaannya, taruh wortel di salah satu sisi.


  • Gulung rapat-rapat, bungkus dengan aluminium foil, pelintir ujung kiri dan kanan hingga seperti bungkus permen. Ulangi untuk rolade kedua. 


  • Kukus selama 45 menit hingga matang


  • Setelah 10 menit, buka bungkusan alumunium foil, dinginkan rolade. Iris miring atau datar sesuai selera. Sajikan bersama saus atau gravy (yang saya masih timbang-timbang akan buat sendiri atau beli jadi). Oh iya, rolade ini bisa langsung disantap, tapi ada juga yg digoreng dulu sebelum disajikan..


Review : rouladenya lezat, harum dan lembut dagingnya, manis wortelnya, dimakan begitu saja sudah enak, apalagi pakai gravy atau saus asam manis. definitely akan invest di wajan dadar yang berbentuk kotak persegi panjang (kalau ada) supaya proses membuat dadar kulitnya lebih praktis. 


Saturday, April 09, 2011

Perkedel Tahu

Tahu merupakan salah satu hasil olahan kacang kedelai yang dikenal sebagai makanan super karena tinggi protein dan komposisi asam aminonya paling lengkap. Harga yang lebih murah daripada daging merah maupun produk unggas, membuat masyarakat cenderung lebih memilih mengkonsumsi tahu sebagai bahan makanan pengganti protein hewani untuk memenuhi kebutuhan gizi.

Pada tahu terdapat berbagai macam kandungan gizi, seperti protein, lemak, karbohidrat, kalori dan mineral, fosfor, vitamin B-kompleks seperti thiamin, riboflavin,  vitamin E, vitamin B12, kalium dan kalsium (yang bermanfaat mendukung terbentuknya kerangka tulang). Dan paling penting, dengan kandungan sekitar 80% asam lemak tak jenuh tahu tidak banyak mengandung kolesterol, sehingga sangat aman bagi kesehatan jantung. Bahkan karena kandungan hidrat arang dan kalorinya yang rendah, tahu merupakan salah satu menu diet rendah kalori.

Di balik kelezatannya, tahu menyimpan khasiat medis tersendiri. Sebuah studi oleh tim medis dari Kanada membuktikan bahwa tahu dapat menurunkan kolesterol jahat dalam tubuh. Studi yang dipublikasikan di American Journal of Clinical Nutrition dilakukan pada 55 orang lelaki dan perempuan usia setengah baya yang mengidap kolesterol tinggi.
Setelah mengikuti diet sehat, partisan tersebut diikutkan pada pola makan beragam, mulai dari kacang almond, tahu, sayuran mentah, dan jenis makanan kedelai lain. Setelah setahun, kolesterol mereka diukur. Hasilnya, mereka yang mengonsumsi tahu mengalami penurunan kolesterol lebih besar dibanding kelompok pengonsumsi makanan lain. Penurunan ini dapat mencapai 10-20 persen.

Selain menurunkan kolesterol, tahu juga terbukti dapat mencegah kanker payudara. Mereka yang mengonsumsi tahu 25 persen lebih banyak mengalami peningkatan pembentukan estrogen dibanding yang tidak. Tekanan darah mereka juga lebih rendah ketimbang kelompok yang tidak mengonsumsi tahu.

Rahasia khasiat tahu ternyata ada pada kandungan isoflavon yang mengandung hormon estrogen. Selain mencegah kanker payudara, isoflavon juga memperlambat proses penuaan pada perempuan. Isoflavon bukan hanya terkandung dalam tahu melainkan juga pada semua makanan berbahan dasar kedelai seperti tempe, susu kedelai, kecap, dan sejenisnya. (dari berbagai sumber).

Buat yang vegan maupun non vegan, perkedel tahu ini enak buat camilan bergizi maupun lauk makan. Bahan2nya gampang, cara membuatnya sederhana.. Silahkan mencoba ya..


Bahan:
300 g tahu putih (kalau dapat hard tofu bs langsung dipakai, kalau dapatnya silken tofu dikukus dulu spy jadi padat)
75 g wortel (potong dadu 0.5x0.5x0.5cm)
1 batang daun bawang, iris halus
75 g jagung pipilan
1 sdm bawang merah goreng, haluskan
1 sdm bawang putih goreng, haluskan
1 butir telur ayam
1/2 sdt merica bubuk (sesuai selera)
1 sdt garam (sesuai selera)
1 sdm tepung terigu
2 sdm tepung beras
minyak goreng baru

Cara membuat:
Tekan-tekan tahu putih hingga seluruh airnya keluar.
Haluskan tahu lalu campur dengan semua bahan hingga rata.
Bentuk adonan sesuai selera. 
Goreng dalam minyak panas dan banyak hingga kuning kecokelatan.
Angkat dan tiriskan.

Tuesday, October 26, 2010

my fave rendang recipe

here's my favourite rendang recipe.. it's such a lovely dish, a labour of love's product :D the meat will be so tender, some still intact in pieces, some will shred from repeatedly stirring in the pot. my mom made rendang with pressure cooker, sometimes she add small red beans, and tiny potatoes. some people prefer the rendang has thick oily sauce, some prefer dry rendang. i love rendang with a bit of sauce, but hubby loves dry rendang, there's no compromise here.. today i cook rendang and nasi uduk (rice cooked in coconut milk+bay leaves+chopped galangal+bruised lemongrass+salt). no veggies to cooked today but i promise i'll put steamed carrots and broccoli on our plates :D


preparation and cooking time 3-4 hours

ingredients :
2 kg lean beef, cut 3X3X2cm
3 stalks of lemongrass stics, washed, bruised with mortar
2 pcs turmeric leaves (if you can’t find this, omit it from the recipe)
5 pcs lime leaves
4 pcs bay leaves
1 tsp tamarind paste, dilute with 2 tbsp water
500 ml mixture of 100ml thick coconut milk+400ml water (or beefstock)
500 ml mixture of 400ml thick coconut milk+100ml water (of beefstock)
3 tsb grated palm sugar
salt to taste (saltiness of each brand is vary, sometimes i put 3 tsp)
100g desiccated coconut toasted in a wok until golden brown (optional)

grind :
20 red chillies
fresh ginger as big as your thumb
fresh/frozen galangal as big as your thumb
15 shallots/brown onion
6 large garlic cloves
5 candle nuts
1 tsp pepper

method:
- in a pot, heat a little bit of oil (3-4 tbsp of vegetable oil or olive oil) saute the ground ingredients, lemongrass, turmeric leaves, bay leaves and lime leaves until fragrant. pour 500ml mixture of coconut milk, add tamarind and salt, set on low to medium heat, bring to boil for a couple of minutes and the milk thickens and becomes oily.
- add beef, desiccated coconut and palm sugar, cook until the meat becomes tender. stir occasionally in low/medium heat, beware of the bubbly sauce. add the thick coconut milk and salt that suit your taste, cook in low heat and stir occasionally until the sauce reduced and the color turns brown.

note :

- it's best if you use high pot (because in this cooking proccess, the boiling coconut milk tends to bubbles and splatered everywhere and messed the stove, you or whoever the stirrer and sometimes the kitchen floor) and preferably pot with thick base so the meat wont get burnt easily just in case you forgot to stir.
- my friend makes rendang with slow cooker, she said it turns OK without the fuss of stiring occasionaly, now i got the urge to buy a slow cooker too!!!

Tuesday, September 14, 2010

gado-gado and chicken satay..


last week, i bought a woman weekly magz, and they have easy asian theme recipe pages, like laksa, fried noodle, and gado-gado. yes, they put the "gado-gado" word, not steamed veggies salad with peanut sauce dressing. :) and suddenly i want to eat gado-gado.

so yesterday, i went to the asian stores to buy the bottled peanut sauce for gado-gado, and ready made peanut sauce for chicken satay. i am lazy, and i never ever succeed on frying the peanut (read : burnt). so, to save my self from getting upset, i just bought them, KOKITA for gado-gado, and Enak Eco for the satay.

then i bought the ingredients (brocoli, carrot, gourmet potatoes, peas, cabbage), egg, tofu, tempe, and about 800gr chicken meat (chicken thigh more juicy than breast).

i marinated the chicken pieces in mashed garlic, kecap manis, kecap asin and a little bit oil, the longer the better, but if 3 hours is all you got, then go for it. meanwhile, soak the bamboo skewer in water to prevent got burned when we grill the satay. then, the pain part, threading chicken pieces into the skewer.. i got about 30 sticks of satay. saved 10 satay for abenk's lunch box tomorrow, and grilled the rest for tonight's dinner. and since we dont have a barbeque, i just toss them in the oven grill. they turned out good, welldone without those smokiness from chargrill.

the table was set for two, actually it was not SET, i just scattered everything on the table because I AM LAZY..
we have some ketupat lebaran from wina, and i bet abenk will have his satay and gado-gado accompanied by those ketupat. but me, NOT. i have always eat gado2 without carbs because i want to be full with fiber from the veggies, and protein from the tofu, tempe and chicken satay. YUMMO!


one of the best dinner i have ever cooked!
;p

Saturday, August 07, 2010


Ditinggal suami kerja di site selama 11 hari bikin saya cemas pas lihat roti tawar yang masih banyak padahal tinggal dua hari lagi masa layak konsumsinya. Kepikiran untuk membuat Puding Roti Karamel karena bahan2 lainnya pasti ada di lemari dapur. Resepnya boleh dapat dari dapurbunda.com tapi penyelesaiannya pakai sedikit improvisasi.

Bahan:

75 gr gula pasir
5 butir telur ayam
300 cc susu
1 sdm mentega, lelehkan dan dinginkan
1/4 sdt kayu manis bubuk
2 sdm mentega untuk menggoreng
8-10 iris roti prancis, tebal 1 cm (saya pakai roti biasa utk toast)
50 gr kismis
Kayu manis bubuk untuk taburan

Karamel:
150 gr gula pasir
175 cc air
1/2 buah jeruk nipis, ambil airnya

Cara membuat:

Karamel :
Lelehkan gula hingga kecoklatan (dengan api yang kecil), tuangi air dan air jeruk nipis lalu masak hingga gula larut. Angkat dan tuang ke dalam pinggan tahan panas. Sisihkan.

Puding Roti :
- Panaskan mentega, goreng roti prancis hingga kedua sisinya berwarna kuning.
Angkat dan sisihkan.
- Kocok gula pasir dan telur hingga gula larut. Tambahkan susu, mentega leleh, dan kayumanis bubuk, aduk rata. Tuang dan saring adonan telur ke dalam pinggan tahan panas berisi karamel. Atur potongan roti prancis di atasnya lalu taburi dengan kismis.
- Tim puding karamel roti dalam oven bersuhu 160 derajat celsius atau kukus selama 45 menit hingga matang.
- Keluarkan dari oven. Taburi kayu manis bubuk dan sajikan hangat-hangat.

Improvisasi : Saya menuang sebagian karamel di dasar pinggan tahan panas, sisanya dituang di atas puding yang sudah hampir matang, lalu kembali masuk oven selama 5 menit.

Friday, April 16, 2010

cosy soup, anyone?

di majalah glamour teranyar, ada sup yang cocok banget untuk "diminum" pas musim dingin seperti sekarang ini.. namanya creamy dolcelatte and tenderstem broccoli soup with tomato and herb croutons , resep dari buku jo pratt : in the mood for entertaining tapi yang barusan saya buat ini nggak pake keju dan brokoli yang namanya terlalu sophisticated itu, juga croutons aslinya karena nggak punya roti tawar dan sundried tomato.. lain kali aja :p

bahan sup :
1 bh brokoli yang cukup besar, potong menurut kuntum
1 cup baby peas
1/2 bawang bombay, cincang halus
2 siung bawang putih, keprek
1 batang daun bawang yang kecil, iris kasar
1 liter kaldu sayuran atau kaldu ayam
setangkup keju cheddar parut (the more the tastier)
1 sdm olive oil
lada
philadelpia cooking cream

bahan roti oles bawang putih :
1 roti perancis, iris 1 cm
2 sdm blueband
1 sdt bubuk bawang putih
1 sdm campuran parsley dan oregano kering

cara membuat :
- campur blueband, bubuk bawang putih dan campuran parsley dan oregano kering hingga merata. lelehkan dalam microwave selama 10 detik. oles di tiap irisan roti, panggang sesuai selera.
- panaskan panci, tuang satu sendok olive oil, tumis bawang bombay dan bawang putih sampai harum dan lemas. masukkan brokoli, peas dan kaldu, masak hingga mendidih selama 5 menit. matikan api.
- saring sup, pisahkan kaldu dan sayurannya, sisakan beberapa kuntum brokoli. proses sayuran dan keju dengan food processor atau blender sambil masukkan kaldu sedikit demi sedikit sampai tingkat kekentalan yang diinginkan. tambahkan lada sesuai selera. sup saya nggak pakai garam sama sekali karena sudah pakai cukup banyak keju, jadi cukup tasty lah menurut lidah saya.
- tuang sup ke mangkuk atau cangkir besar (cangkir sup??), beri satu sendok teh cream (mungkin yogurt juga bisa), atur dua atau tiga kuntum brokoli, hidangkan dengan roti bawang putih. sajikan selagi hangat.

abenk bilang cosy soup ini rasanya enak walau perutnya nggak kenyang (nanti malam pasti perutnya bakalan minta diisi lagi), noelle yang baru kelar dinner ikutan menghabiskan sup saya sesendok demi sesendok.. seneng banget liat anak nggak susah makan sayur.. YAY!!!

Tuesday, April 13, 2010

eggplant parmigiana

can you imagine how sinful this dish? it's eggplant, baked with tomato sauce, mozarella and cheddar cheese. i was longing for this dish ever since i tasted that entree at singapore art museum tratoria. i forgot the name, but it was 4 pieces of eggplant baked with something that taste like lasagna sauce but there was no beef on it, and it has the gooey-ness from mozarella.. yummo!

so i googled and i got recipes for eggplant lasagna and eggplant parmigiana they both using the same type sauce (the tomato sauce+bechamel sauce) and mozarella. in my opinion : lasagna means you use lasagna sheets, and parmigiana means you coat the eggplant with egg and flour then shallow fried it, and the rest are the same. i opted for eggplant lasagna because if i make parmigiana i will eat heaps of eggplant soaking in oil. there's no way i will eat that! so i made this baked eggplant without the lasagna sheets and bechamel sauce (i found that on almost every recipes), afterall i have to cut my carbs. but hey, can i call this dish as eggplant lasagna while in fact i do not use lasagna sheets at all?? *scratchie scratchie*

and finally, here's the recipe i got from Jamie's Italy by Jamie Oliver.. *clap clap clap* This classic northern Italian recipe is a great way to serve eggplant. By layering the eggplant with Parmesan and tomatoes and then baking them, you get an absolutely scrumptious vegetable dish. Great served with all sorts of roasted meats and with roasted fish as well. One of the tweaks I really like doing with this recipe is to grill the eggplant - this makes it a bit more creamy on the inside - instead of frying it in oil, which tends to make it greasy.

EGGPLANT PARMIGIANA (melanzane alia parmigiana)
Serves 6

Ingredients
• 3 large firm eggplants
• olive oil
• 1 onion, peeled and finely chopped
• 1/2 a bulb of spring garlic, if you can get it, or 1 clove of regular garlic, peeled and finely sliced
• 1 heaping teaspoon dried oregano
• 2 14-oz. cans of good-quality plum tomatoes or 2 1/4 Ib. fresh ripe tomatoes
• sea salt and freshly ground black pepper
• a little wine vinegar dont have it
• a large handful of fresh basil leaves dont have it
• 4 large handfuls of freshly grated Parmesan cheese
• 2 handfuls of dried breadcrumbs dont have it
a little fresh oregano, leaves chopped
• optional: 1 5-oz. ball of buffalo mozzarella

Directions
First things first: remove the stems from the eggplants, slice them up into 1/2-inch-thick slices, and put to one side. Whether you're using a griddle pan or a barbecue, get it really hot. Meanwhile, put 2 or 3 glugs of olive oil into a large pan on a medium heat. Add the onion, garlic, and dried oregano and cook for 10 minutes, until the onion is soft and the garlic has a tiny bit of color. If you're using canned tomatoes, break them up, and if you're using fresh tomatoes (which will obviously taste sweeter and more delicious, if they're in season), very quickly prick each one and put them into a big pan of boiling water for 40 seconds. Remove from the pan with a slotted spoon and put them into a bowl of cold water for 30 seconds, then remove the skins, carefully squeeze out the seeds, and cut up the flesh. Add the tomato flesh or canned tomatoes to the onion, garlic, and oregano. Give the mixture a good stir, then put a lid on the pan and simmer slowly for 15 minutes.

Meanwhile, grill the eggplants on both sides until lightly charred - you may have to do them in batches, as they probably won't all fit into your griddle pan in one go. As each batch is finished, remove them to a tray and carry on grilling the rest, until they're all nicely done. When the tomato sauce is reduced and sweet, season it carefully with salt, pepper, and a tiny swig of wine vinegar, and add the basil. You can leave the sauce chunky or you can puree it (definitely puree it).

Get yourself an earthenware type dish (10 x 5-6 inches). Put in a small layer of tomato sauce, then a thin scattering of Parmesan, followed by a single layer of eggplant. Repeat these layers until you've used all the ingredients up, finishing with a little sauce and another good sprinkling of Parmesan. I like to toss the bread crumbs in olive oil with a little freshly chopped oregano and sprinkle them on top of the Parmesan. Sometimes the dish is served with torn-up mozzarella on top, which is nice too. Place the dish in the oven and bake at 375°F for half an hour, until golden, crisp, and bubbly. It's best eaten straight away (i ate 1/3 from the first batch straightaway after resting for 5 minutes, SINFUL SINFUL SINFUL), but it can also be served cold. You can use the same method substituting zucchini or fennel for the eggplants - both are delicious. But do try making it with eggplants - you'll love it!


Monday, April 12, 2010

carrot cake

i love carrot cake, just love it, love it, love it. PERIOD. first time i heard about carrot cake was when i watched andy garcia & meg ryan in the movie "when a man loves a woman". my mouth was suddenly dry as the result of imagining the moist grated carrot inside a cake with frosting.. yummm... and my obsession with banana cake suddenly gone :p

but my obsession with this healthy-for-your-eye- cake kind of never fulfilled because ONE, i was busy. TWO, i hated cooking/baking. THREE, my mom's oven was/is not properly working. FOUR, i never never never find carrot cake in jakarta. can you believe it???

sooo, long story short, finally i live in the city where you can find carrot cake in almost every market/deli/cafe/bakery/corner. and i got the chance to make my own carrot cake!! noelle loves it too, maybe because it smells so good, rich in spices and moist, and sweet from the frosting... droool (thank god i still got one chunk in the fridge). just in case someday she wants to bake it on her own, she should make the carrot cake with this Martha Stewart recipe..

ingredients
fort the cake :
  • 1 cup sugar
  • 2 large eggs, room temperature
  • 1/2 cup vegetable oil
  • 1/2 teaspoon pure vanilla extract
  • 1/4 cup buttermilk
  • 1 1/2 cups all-purpose flour
  • 1 teaspoon ground cinnamon
  • 1 teaspoon baking powder
  • 1/2 teaspoon baking soda
  • 1/2 teaspoon salt
  • 1 1/2 cups grated carrots
  • 1/2 cup crushed walnut
for the icing:
  • 1 package (8 ounces) cream cheese, room temperature
  • 1/2 cup (1 stick) unsalted butter, room temperature
  • 1 tablespoon pure maple syrup
  • 1/2 teaspoon pure vanilla extract
  • 2 cups confectioners' sugar
method
cake :
  • preheat oven to 350 degrees. Line 42 mini muffin cups with mini cupcake liners; set aside.
  • beat sugar, eggs, oil, vanilla, and buttermilk together in the bowl of an electric mixer fitted with a paddle attachment until well combined.
  • in a large bowl, sift together flour, cinnamon, baking powder, baking soda, and salt. slowly add three-quarters of the flour mixture to the sugar mixture; mix until well combined. add carrots and walnuts to remaining flour mixture; toss to combine. stir into batter until well combined.
  • pour batter into the baking tin or if you use muffin cup fill with about 2 teaspoons batter. bake until a cake tester inserted into the center of cupcakes comes out clean, 10 to 12 minutes. transfer cake/cupcakes to wire rack to cool. let cool completely before frosting with cream cheese frosting.
for the icing:
  • in the bowl of an electric mixer fitted with the paddle attachment, beat cream cheese and butter together until smooth.
  • add maple syrup, vanilla, and confectioners' sugar; continue beating until well combined and smooth.
  • spread on top of the cake/cupcakes.

from The Martha Stewart Show, september 2007

Sunday, April 04, 2010

Gulai Ikan Tenggiri

abenk nggak terlalu suka ikan tapi suka makanan santan, jadi saya coba bikin gulai ikan tenggiri dengan harapan dia doyan.. ternyata oh ternyata, doyan banget...

bahan :
1 kg ikan tenggiri, iris tebal 1.5 cm
1 ltr santan
2 lbr daun jeruk
1 daun kunyit
3 daun salam
1 ruas lengkuas geprek
1 cabe merah panjang, iris tipis
1 pak (250 gr) snowpeas/kacang kapri, cuci, siangi
1 sdm minyak

bumbu halus :
2 btr kemiri
1 ruas jahe
1 sdt kunyit bubuk
3 bawang merah
5 siung bawang putih
10 buah cabe merah/rawit utuh
garam & gula pasir sesuai selera

cara masak :
berhubung disini beli ikannya sudah bersih dan dipotong-potong, jadi saya tinggal melumurinya dengan air jeruk nipis dan garam. diamkan selama 15 menit, tiriskan.
tumis bumbu halus dengan 1 sdm minyak goreng, masukkan daun salam, lengkuas, daun kunyit dan daun jeruk hingga harum baru tambahkan kemudian santan dan aduk-aduk.
masukkan ikan, aduk-aduk perlahan agar santan tidak pecah tambahkan garam & gula pasir, cicipi hingga rasa pas.
masak sampai ikan matang, baru tambahkan irisan cabe merah dan kacang kapri.
angkat lalu sajikan hangat.

jadi, dengan kuah santan si abenk bisa doyan sama ikan, tapi karena ini masakan santan sebaiknya nggak keseringan bikinnnya, toh si ikan bisa di masak woku atau digoreng baru disiram sambal seperti sambal terong/balado.

Wednesday, March 31, 2010

tahu panggang


dari bahan-bahan ini,


diutak atik dan akhirnya...


menjadi ini!!!

Thursday, March 11, 2010

buntut oh buntut..

susahnya punya suami penyuka buntut sementara istrinya benci buntut.. i just hate the idea of sucking and making out with the oxtail to get the meat out of it.. tapi demi cinta, saya rela lah masak sepanci oxtail soup kesukaan suami.

sop buntut

bahan:
  • 1.5 kg buntut sapi
  • 1.5 ltr air
  • 250 gr kentang, potong-potong
  • 300 gr wortel, potong-potong
  • 3 batang seledri, ikat
  • 1 batang daun bawang, potong kasar
bumbu halus :
  • 5 butir bawang putih, bakar dengan kulitnya
  • 10 butir bawang merah, bakar dengan kulitnya
rempah-rempah :
  • 1 sdt merica bubuk
  • 1 butir biji pala
  • 5 butir cengkeh
  • 4 cm jahe, belah dan memarkan
  • 2 butir bawang putih, bakar dengan kulitnya dan memarkan
  • Garam dan penyedap rasa sesuai selera
pelengkap :
  • seledri diiris halus
  • daun bawang, iris halus
  • bawang putih goreng, remas
  • 2 buah tomat, potong 8
  • 2 jeruk nipis, iris "pipinya"
  • Sambal rawit
  • Emping goreng
  • Acar ketimun wortel
  • Kecap manis
cara masak :

  • siapkan dua panci. dalam panci pertama, didihkan air dalam jumlah yang cukup hingga buntut bisa terendam. dalam panci kedua, rebus buntut dalam air mendidih selama 5 menit, kemudian buang air rebusan itu, baru masukan 1,5 lt air mendidih dan rempah-rempah, masak di api kecil hingga mendidih dan buntut menjadi empuk, seandainya punya panci presto bisa lebih 30 menit saja.
  • kupas kulit bawang merah dan bawang putih yang sudah dibakar, haluskan, lalu di panci ke dua tumis bumbu halus hingga harum, masukkan wortel dan kentang. tambahkan air dari rebusan buntut, masak sampai mendidih, tuang ke dalam rebusan buntut dan tambahkan seledri ikat. biarkan di atas api hingga wortel dan kentang mulai matang.
  • kalau saya, sesudah wortel dan kentang matang langsung saya angkat dari panci, jadi yang tertinggal hanya si buntut yang kalau bolak balik dipanaskan pun nggak akan benyek/hancur tapi justru makin empuk dan gurih.
  • trus, berhubung sup sapi buatan saya selalu keruh karena sarat bumbu, maka saat hendak disajikan biasanya saya menyaring kuahnya supaya lebih bersih, tapi ternyata si hubby ini dasar seneng makanannya super spicy dan sarat bumbu, dia justru suka kalau kuahnya butek dan kental dengan bumbu :)

sebenarnya saya ingin belajar bikin sup buntut bakar karena dulu pernah makan sup buntut bakar yang enak tapi lupa dimana.. duh, kapan ya bisa wisata kuliner lagi?

Wednesday, January 27, 2010

Mie Ayam Jamur


I've got Mie Ayam Jamur Gajah Mada cravings since weekend, so I googled the recipe and got tons of them. I picked several that I really think delicious and got the photo to justify (I know I am that shallow hehe).. Finally I mixed three recipes and got my own Mie Ayam Jamur a la GM.

It is a simple dish, noodle, chicken and mushroom, a bit bok choy, spring onion, fried shallot and clear chicken broth. I was a bit terrified because I am not a good cook and this dish looks simple to eat but will be hard to prepare :p

Fingers crossed, I prepared all the ingredients and hoping it will taste good (even though I knew it would'nt taste anything like GM's because I don't know their secret recipe).

Here's the recipe :

*for the chicken and mushroom toppings*
1 chicken breast
3 chicken thigh fillet
8 pcs mushrooms (they are huge), sliced
1 pc ginger as big as your thumb), sliced then keprek
5 cloves garlic, uleg with salt
3 tbsp sweet soy sauce
1 tbsp salty soy sauce
1 tbsp oyster sauce
1 tbsp corn starch
salt and pepper to taste

*for chicken broth*
4 cloves garlic, crushed
1 shallot, sliced
2 spring onions
salt and pepper to taste

1 package of ready to use noodles (500gr)
3 bunch of pak choy, cut 5cm
1 spring onions, sliced finely
sesame oil

Directions:
I don't have chicken frames to make the stock so I just use the chicken fillets to make the broth. So I just wash the fillets, prepare 4 cloves of garlic (crushed), 1 shallots (sliced) and spring onions (tied). Heat the pot, add a little bit oil, cook garlic and shallot until fragrant, dump the fillets into the pot and spring onions also, lots of water to cover the fillet and a bit of pepper and salt to suit your taste. After 30-40 minutes, take the fillets, let cool and slice into bite size. Strain the chicken broth (I got almost 1 litre of stock, I use half of it to make the chicken mushroom topping), set aside. Throw away the shallots and spring onion, and put back the crushed garlic into 500 ml stock to make the chicken topping mushroom.

In a wok, heat a little bit of oil, cook garlic and ginger untill fragrant, add chicken pieces and sliced mushroom, stir. Add salty soy sauce, sweet soy sauce, oyster sauce and 400ml chicken stock. The problem is, I used cooked chicken so they took a little bit longer (than raw chicken) to absorb the soy sauce which give them the sweet taste and beautiful brownish colour. I mixed 1 tbsp cornstarch with 100ml chicken stock and add to the wok to thicken the sauce. Let it simmer for another 30 minutes to reduced and you will get beautiful thick chicken mushroom sauce. Yum!

After that, I prepare 1,5 litre water bring to boil and cook the noodles until tender but still chewy. I did not add oil into the water because I prefer my noodle clean, and after all I need to cut back my oil/fat intake :) Strain the noodle, wash with cold water, put in the mixing bowl. Do the same with the pak choy. Slice the spring onions finely, set aside. To prevent the noodles from getting dry and stick to one another, I just drizzle them with the sesame oil and sauce from chicken and mushroom toppings, but please do this when you are going to eat this dish right away otherwise the noodle will absorb the sauce and become too tender.

To serve, just place the noodle into your bowl, set the veggies, chicken mushroom toppings and sauce, springkle of fried shallots. In another bowl (smaller one) prepare hot chicken broth, drizzle with sesame oil and sprinkle with green onion.

All set and ready. After a few hours in the kitchen, the famous noodle is FINALLY ready, yes it feels took forever to cook especially when you have 1 year toddler who refuse to nap and insist to join you in the kitchen inspecting every drawer and pantry door. Abenk went home just in time for lunch, had two portions of Mie Ayam Jamur a la GM.. And what about me? Well, I just smiled and pat my self in the back :)

I wished I had time to make the condiments like sambal dan the chicken oil (to be mixed into the noodle) but next time I will try to make them a day in advance.

Vinegar Chili Condiment:
12 pcs of red chilis – boil till soft
2 pcs crushed garlic
cuka, sugar & salt to taste
Process them all together and serve fresh.

Special Chicken Oil
1 or 2 cup of fresh cooking oil
chicken skin/fat
2 pcs crushed garlic
Heat oil on low heat, mix in chicken skin/fat & garlic, leave it cook till the skin curled. Let cool & keep in fridge till the next day.