Hey! I've been neglecting my own blog, let alone contributing on my other blog.. I've been busy packing and unpacking because we're moving house, and last week we went to Parkes and Sydney, NSW, having a little (winter) break and visiting our childhood friend..
I've been patient enough not to touch my sewing machine during the unpacking period, but now everything is settled and on their places, I can start sewing/refashioning again.. I got heaps of unfinished projects, don't know when I'll be able to work on them, but as wise man say, one step at a time..
As a starter, I made a pair of jeans for Noelle out of my old jeans. At 98cm, she's quite tall for a 2,5 yo toddler, and I found it's hard to find a perfect jeans that fit her because shopping was not fun for her and she'll grown out of it so soon. So, I'll just make one for her. I was going to make a tutorial but turns out it was hard to take pictures between the sewing process.. Here's what I have for now.
My old Billabong jeans, well loved and I wore it to death (approx twice a week in 7years), got frayed patch on the crotch area (from my constant rubbing inner thigh).. But I love that it was so soft, perfect for Noelle (she hated hard/stiff fabrics), and I intend to keep the worn out look on the side seams so the jeans looks not new.
I started with cutting the inner leg seam, of course you can rip it with seam ripper if you want to get as much as possible fabric to work with.
Then I removed the pocket with seam ripper because I love pockets and I'll use it again later.
Then I laid out the pants, tracing toddler pants pattern (the green fabric) on the jeans with chalk. To make the toddler pants pattern, I just traced her favourite pants, and flip it so I got back and front side of the pants as one continuous piece, then I'll call it the lefty/righty piece. But its a bit tricky to work with because when you tracing it on the jeans, you have to make sure you flip it so you got the right side of the jeans for your piece. Hope what I wrote made sense to you.
Here's the pieces, left and right piece of the pants, and 2 pockets. See how I got the worn out side seams and hem? I know you all capable to joining the left and right pants so I wont bother to take picture of the process.
After joining the left and right pieces, I sew the pockets on the bum.
Then I sew a 6 cm fabric strip on the waist to make the elastic casing. Actually I was just going to fold and sew the jeans to make the elastic casing but I found it will be too bulky and decided to make the casing with medium weight cotton from my stash.
Don't forget to press the seams to make it more neat and professional. Then fold and press again before sewing the casing.
Here's the finished product. I love how my old jeans just moving from my wardrobe to my daughter's :)
-=G=-
Showing posts with label sewing/crafting. Show all posts
Thursday, June 09, 2011
Monday, April 25, 2011
covered button
Today I made two covered button. The fabric is the same with this necklace. It was my first time making covered button and turn out it was fun and easy. The fabric was quite sheer so I need to put one layer of thick jersey to cover the metal base, and to make it a bit textured.
I use them as pendant and hairclip. My friends told me to sell them, but I need more practising before going serious in selling my handmade products.
-=G=-
I use them as pendant and hairclip. My friends told me to sell them, but I need more practising before going serious in selling my handmade products.
-=G=-
Sunday, April 24, 2011
Fabric Necklace
I found this lovely top at thrift shop, it was a bit pricey, AUD 10.99.. I was shopping with my friend Monica, and she even asked the girl at the register why does the top overpriced. The girl said it was because of the material is some kind of special fabric. Yeah, I know.. It was 100% cotton, so thin and light and see through, flowy and thinner than cotton voile. I bought the top anyway, because the moment I saw it on the clothes rack I know exactly what it will reborn to.
This is the top.. Size (marked) M top, but it was teeny tiny, it was like XS.. there were pulled seams, I think the previous owner was gaining a lot of weight but insist to squeeze into this lovely top..
Ballooned long sleeve meaning lots of fabric :)
Complicated pattern on the bodice with squared neckline, row of covered buttons, and a bit ruffled hem, it was a gorgeous, floaty and supergirly top.. I think the wearer must put on something like camisole or bodysuit underneath this top..
The brand was Cherry Lane Melbourne, the fabric (and maybe the garment) was Made in India.
And after a few snip in here and stitches in there, tie in here and there in less than one hour, I got one gorgeous necklace. Still got lots of fabric, I can make about 6-8 more of this.
-=G=-
This is the top.. Size (marked) M top, but it was teeny tiny, it was like XS.. there were pulled seams, I think the previous owner was gaining a lot of weight but insist to squeeze into this lovely top..
Ballooned long sleeve meaning lots of fabric :)
Complicated pattern on the bodice with squared neckline, row of covered buttons, and a bit ruffled hem, it was a gorgeous, floaty and supergirly top.. I think the wearer must put on something like camisole or bodysuit underneath this top..
The brand was Cherry Lane Melbourne, the fabric (and maybe the garment) was Made in India.
And after a few snip in here and stitches in there, tie in here and there in less than one hour, I got one gorgeous necklace. Still got lots of fabric, I can make about 6-8 more of this.
And the bodice is still intact, I put it on Noelle and she got boho look with the bodice, it became a floaty vest. I might make it as her vest, but I need to adjust the armhole and reinforce the seams that has been pulled due to the thin material..
-=G=-
Thursday, April 14, 2011
Skull Bag, refashioned from skirt
Another refashion project, skirt to bag..
As I have wrote long long a go, I like skull images, and when I saw this H&M skull skirt on a thrift shop, I snatched it right away because I got a premonition that the skirt will be reborn as a bag. It was a teeny tiny skirt, and the lady on the register got questioning look because there was no way I can squeeze in to that skirt. I paid AUD4, washed it and tried it. Label stated size UK36 which will be suitable for AU10 or small 12, while I am a larger 12. But the fabric was medium cotton with 2% elastane, so it stretches a bit and it fits! YAY! But of course I have to suck my -used to have abs but now bulging- belly or the skirt will riding up north.. Another reason to grab the scissors and start prepped the pieces.
Here's the before photo : pleated skirt with skull pattern all over
Prepped the pieces : black canvas for interior and pockets, bias tape, cotton webbing strap, hardware for adjusting the strap, magnetic snap and keystrap. At this point I have sewn back the H&M care label to the black lining..
Finished bag : not bad for my first attempt making messenger bag/diaper bag without commercial pattern. I use this bag as inspiration but I added width and pockets and lining to make the skull bag more interesting. Too bad the original skirt was too short and the unpicked pleats still shown on the flap eventhough I have washed/ironed/steamed the fabric over and over.. :( My husband said my bag looked great, especially the adjustable doublesided strap. Well, if he like it so much, we can use it as a nappy bag and he will got the chance to use the bag, IF we got other baby..
I made two extendable pockets in front of the bag (covered by the flap), I can put my coin purse, mobile, candy, even noelle's AVENT 260ml bottle.. I also sew keystrap and 2 pockets inside the bag, suitable for my wallet, pen, mobile or pocket camera.
Can't wait to showcase my new handmade skull bag..
-=G=-
Sunday, April 10, 2011
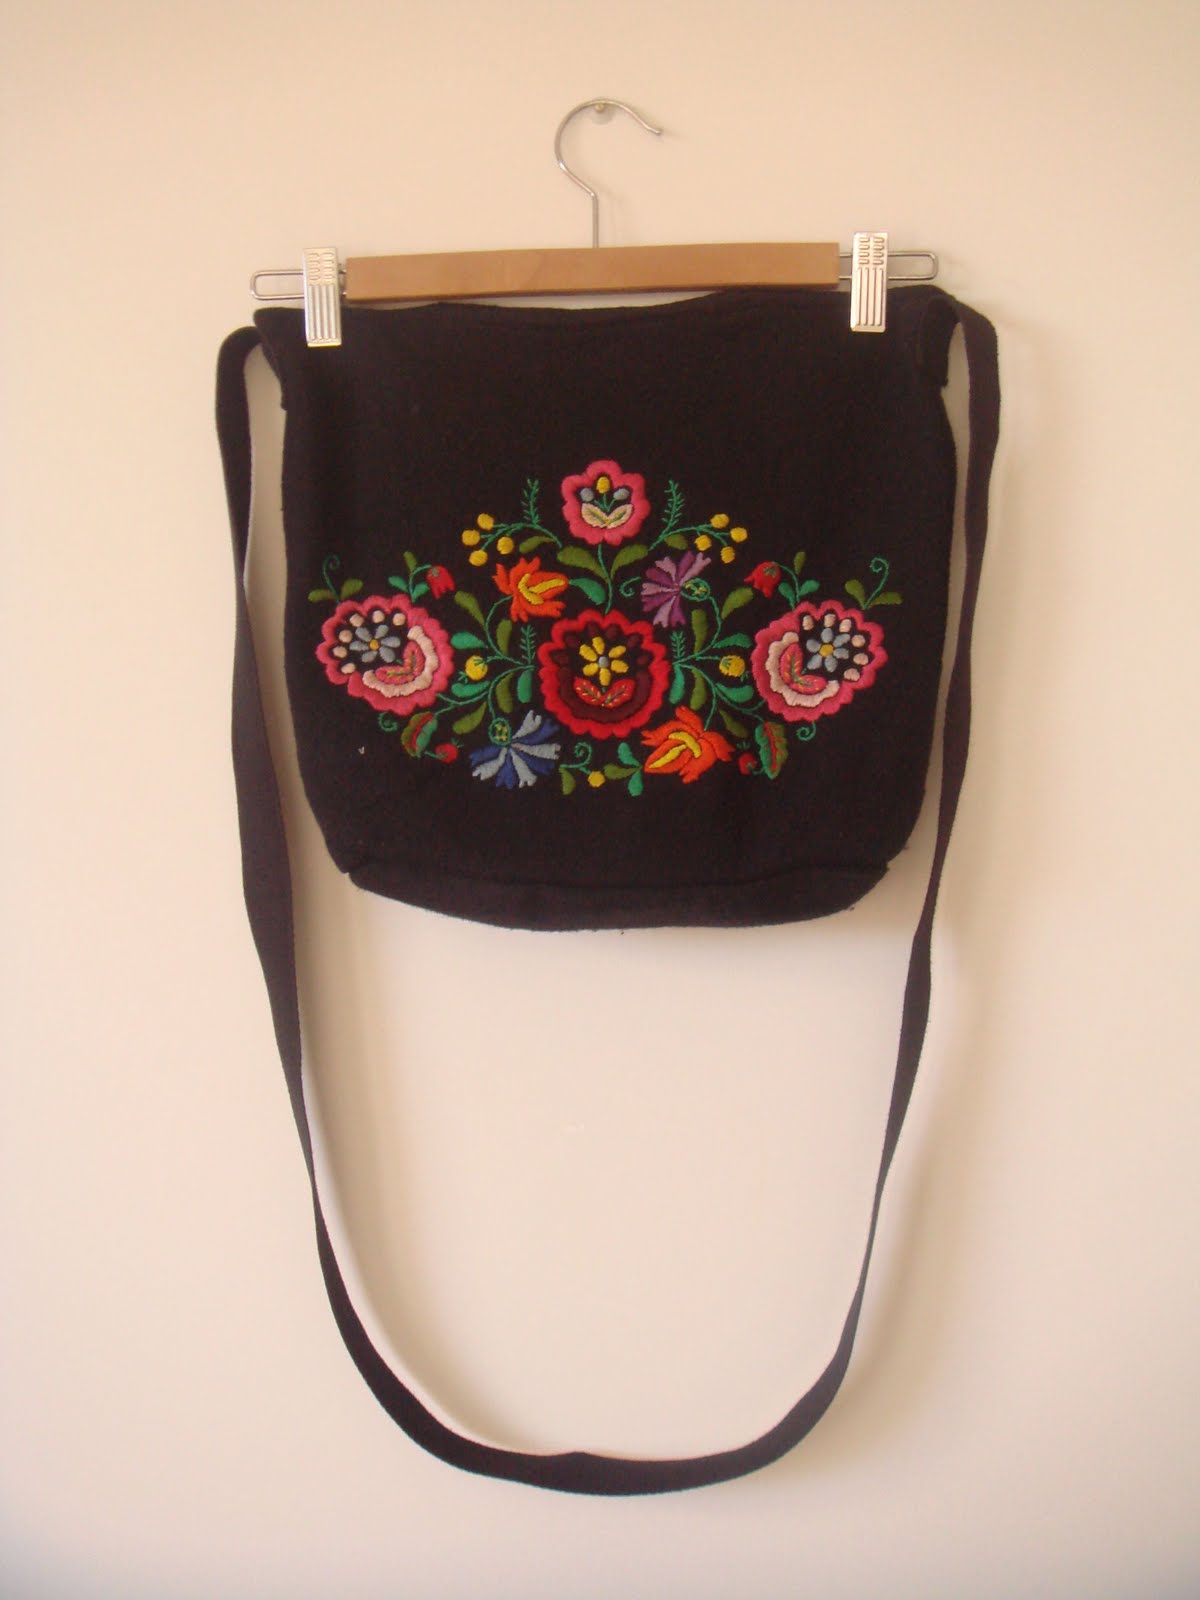
The tale of a (thrifty) Hungarian bag
Once upon a time, there was a bag that looked like this belong to someone in Far Far Away..
She got bored with the bag and threw it away/donate it
until it arrived in my country, Never-Never Land..

I spotted it in a flea market in Makassar, year of 2000.
It looked gorgeous, peeking under hundreds other bags from Far Far Away.
I took it home with me after paid Rp5000, or about 60c.
I washed it with hot water to kill all the germs, and washed it again and again, until it feels right.
Then I use it to carry my books to uni, to hang out with my friends, to the market with my mom.
In the year of 2004, I was working as journalist, and I felt that tote bag was un-practical.
So I chopped the strap, put another long webbing strap on both side
and the bag became a sling bag.
But, the wool material was pulled to the north a bit,
maybe because of me, or the previous owner loves to carry it with load of stuff in it..
You can see in the next picture, the bag looked uneven right?
So, aesthetically my eyes hurt because of those pulled area, and finally I do the deed.
I have to save my thrifty Hungarian Bag!
When I am done, I love it before, I love it even more now.. :)
This is the embroidery that makes me smile.
I am not a girly girl, but I can't help smiling when I see this gorgeous flowers.
The labels sewn inside says "Made in Hungary", "Hand Embroidery" and "55%wool 45% cotton".
Even the labels was handwritten!!! :)
Somebody put a lot of effort in this bag, and I determined to save it till death do us part.
I use black canvas for outer part, red canvas for lining, black cotton for pockets,
and as the result I got one very interesting bag.
My first encounter with magnetic snaps.
It's easy!
The interior of the bag. Love the red and black combo.
Love the roomy pockets, for my pocket camera and cellphone.
I managed to sewn back the labels :)
And to make the timing perfect, it's autumn here in down under.
This woolen bag is just the perfect match for the season.
I am glad that I saved my gorgeous-hand embroidered-thrifty-Hungarian-Bag
from going to landfill
because now the bag and I live happily ever after.
The End.
Wednesday, April 06, 2011
batik tulis dress..
Finally, I braced myself and made a batik tulis dress for me last week.. Usually I only refashioned tired batik skirt, tablecloth or cheap batik. Working with batik tulis was a bit scary because batik tulis is a unique and a bit pricey fabric.. I bought the fabric like a year a go, it was named Cala Culu. Sounds funny, eh?
I did not use any commercial pattern for this maxi dress, as usual I sketch the idea on a paper then marked the fabric with calk and start cutting. For this dress, I only make raglan bodice/raglan sleeve with neck binding, and rectangle for the bottom part. Then I make casing for elastic to avoid bolster look when wearing this dress.
I tried to use all the fabric, including narrow border one side which I use as the sleeves. I make darts to shape the sleeves because I avoid ruffle/flutter sleeve. It turns great and I love the sleeve. In my opinion, this dress was a great concept, but badly executioned. The neck binding is too wide, so I can not bow when wearing this dress unless I want my boobs popping out from the dress :D and the gathering on the chest is uneven, and but un-noticable if I wear it on the night.
I managed to hand-embroidered "Handmade by Glenda" but the result was horrible. In my defence, I was sleepy but insist to finished everything before I went to bed.
Monday, February 21, 2011
my first attempt making bedding set..
it's been a while since i post something, it's just a quick post about my latest sewing project, bedding set for noelle...
now that she's 2 yr, i think it's time for her to brace herself to sleep on her bed. she, until now, thinks that my bedroom is her bedroom while her actual bedroom is her play room. i can't blame her tho, we used to co sleeping since she was newborn, and eventhough i put her to sleep on her bed, somehow she managed to get back to my bed (sleep walking in total darkness).. i have no idea how to train her to sleep on her bed, bed time or nap time.. i reckon she loves to sleep in minimal light (like in my bedroom, while in her bedroom she can sunbathe morning-afternoon), and she loves our soft and fluffy mattres with good support. so, we bought her the same mattress in king single size, and since she sleep like a tornado and prone to fall out of the bed, bed frame is out of question until later.
all looking good in her room, but, one thing for sure, we dont have proper bedding set for her. it's all those plain cotton jersey sheets and pillowcases, or those flowery or leafy sheets or whatever i can grab from our linen cupboard, and they are in queen bed sizing because they are supposed for the guest room bed.
so, i had this idea to make her own bedding set, with appropriate prints of course. in this post, i finished a blue sheet/orange/white farm animal prints.
i got the farm animal prints from nearby thrift store, $2, it was a toddler bed sheets, and wont fit noelle's king single size mattress (110x210cm). the blue fabric was flat sheet that was on sale on Target, and the orange fabric was purchased at Spotlight on Saturday morning.
the rest was easy, sewing the sheets, then two pillowcases, and since i have some scraps from 3 fabrics, i managed to produce one small long pillowcase, and one throw pillowcase, looking cute all together.

the cute farm friends
the whole set, there's farm animal "border" because i was short of the fabric.
i need 294cm, but the flat sheet was only 275cm..
so i just cut the flat sheet by 2/3, and sew the farm animal fabric to give extra length.
and it worked! :)
i managed to make neat seam! important for sewing without serger..
hubby said the pillowcase look like storebought.. neat!
small long pillowcase with farm animal applique
the new bed sheets matched the moon seat. and you can see, the fitted sheet is not so fitted because i was wrongly measured the mattres as 120x210cm, not 110x210cm..
my next project is another bed sheets for noelle, the fabric from IKEA range, fabler series mixed with another unused flat sheets. cant wait to start sewing again, see you soon!
Saturday, November 06, 2010
i made a bag!!

I've been looking for a roomy and comfy sling bag for out and about in weekends.. I do love my leather shoulder bags, but sometimes I need one hand to hold the pram, and the other for tagging the smartcard at the station or bus, ooooorrrrr for admiring anything that caught my eyes on! So, a constantly slipping shoulder bag would be one of the the unpleasant things that could happen to you in those situation :D
I love going to Fremantle and Subiaco Market, window shopping around the street mall, and a sling bag have always be my perfect to go bag, ever! I have 4 sling bags (one leather, one faux leather, one canvas and one cotton) but they are to small for my liking. I love to crammed my bag with my Braun Buffel long and bulky wallet, coin purse, make up kit bag (Clinique compact powder, Clinique sunblock, Candy Kisses lipbalm, Blistex liptone, Lancome mini eyebrow pencil+brush, Clinique mini mascara), Revo sunnies + case, Dettol hand sanitiser, kleenex, wet tissues, a pen, house keys, car keys.. And if I am lucky, I also get to hold my hubby bulky wallet.. :D
So, along came with my sewing addiction, I got the idea to make my own roomy and comfy sling bag. I browsed for free pattern and easy instruction, and I found this reversible shoulder bag pattern from Beth, check her site Lulalouise crafts and designs.
I was nervous but turns out the pattern and the instruction was so easy to follow. I did spice it a bit because I want make it as a SLING Bag (must add length in the handle, about 15cm) with lining with 2 pockets and key strap (because I don't like spending minutes in carpark digging my bag to find my car key, yeah I feel vulnerable if I can't see my surroundings), and a loop + button to secure the opening from pick-pockets!! :D
I purchased the fabrics, washed them and dry them in the sun.
Prepped my pattern cuts, iron the interfacings on the outer fabric to give it a shape because it's a light-medium weight cotton.
Sewn in the big button
Roomy Pockets, key strap and button loop.
In less than 6 hours, I got my dream roomy and comfy sling bag.. My hubby praised the bag, Thanks to you, Beth! Now I am going to furniture shopping with my kid and hubby.
Wednesday, October 27, 2010
made my first insulated bag
finally, i made my first insulated bag!

i was making a lunch bag for my hubby a couple of weeks a go, post the finished product at my facebook page, and a friend commented that it would be better if the lunch bag is insulated. well, my hubby workplace has microwaves and he can reheat his lunch meal anytime so i did not see the urge to make insulated bag. but then, summer is aproaching, and it means picnic picnic picnic or strolling strolling strolling and we'll be need cold/chilled drink.. and i determine to try make insulated bottle bag/carrier to fit 1,5 ltr bottle.
i bought outdoor furnishing fabric (from remnant basket), insulate batting with foil, color coordinating nylon strap and set of buckle. i sketch the bottle carrier and figure how to sew it as i go step by step.. it's hard to sew on hard/thick fabric like this, especially on the bottom binding. this is a succeed (yesterday) naptime project, i did this while i cooked rendang. a bit in a hurry, but in the end, i am very happy with the result eventough the insulate system has not proven yet.
my hand aching to make another one!!
Wednesday, October 20, 2010
happy 22 month, kiddo!!
noelle turn 22 month today.. trouble two is approaching!!! her personality shown day by day, she's an outgoing person, loves to dance, talk to stranger, loves to "help" mama, and she made me smile by just looking at her. i love you, kiddo!
here's what i made for her today, another pillowcase top and puffy pants. she's a tomboy girl (everyone can see that) and this combo is just perfect for a tomboy girl! i love the top because it's so carefree and easy to put on her despite her big head (and easy to make too); and the puffy pants is perfect because she loves to sit on the floor with split style, or squat to admire something in the grass, or messing with the dirt.

red and white polkadot crepe (remnant basket, $0.60), cotton irregular red spots on white fresh from the bolt, cotton red and white stripes for the waistband (remnant basket ($0.30)
Label:
celebration,
parenting,
sewing/crafting
Monday, October 18, 2010
Friday, October 15, 2010
naptime sewing
noelle doesn't like to nap, while i want to sew when she nap. but in the end, i managed to sew something for her in the past two days.
refashion from my old mooks tee, i need to make a matching diaper cover/bloomers because this as a dress was a tad short..
sakura pants with waist tie, cost 0.60 because the fabric from remnant basket. elastic was my saviour of the day because i made a tad long pants and she almost tripped on it, so i fold the hem and insert elastic and it become a puffy pants, a bit harem pants isn't it?
refashion from my old ripcurl tee to toddler maxi dress. i love this tee because of the birds so colourful, so summery. but since it's a bit thin i dont like to wear it anymore. binding and tie from scraps, the nautical red white armpit binding from my FCUK daydress leftover.
Subscribe to:
Posts (Atom)